by Ryan Evans
Aug 23 '18
I get asked quite a bit about who made our explainer video. I actually made it myself, using just Mac's Keynote presentation software and the video editing software, Screenflow. I thought I'd explain exactly how I did it.
I also made a 20-minute tutorial video that walks you through the steps here:
Having an explainer video makes a ton of sense. Done well, it's a quick way to get people to understand your business. There are a bunch of case studies that show how an explainer video can increase your conversion rate anywhere from 10% to much more. But when you decide you need an explainer video, you'll be faced with two options:
I didn't like either option, so I just did it myself. Here's how it turned out:
If cost was the only consideration, I probably would have hired someone to do it. But money isn't the only reason I took this on. Here are a few other reasons I decided to make the explainer myself:
I'm not afraid to drop money on a good explainer video, but hiring someone still takes a fair amount of time. You need to search, hire, explain what you want, make revisions and manage the process.
If you're just starting your company or are still figuring out your business, things are going to change, sometimes a great deal. You might get a new logo, update your website, go after a new market, or add new features or services. When a significant change occurs, you'll need to rehire someone to make alterations or find someone new.
Video is becoming a huge part of marketing. YouTube has over a billion users, and 45% of people watch over an hour of video on Facebook or YouTube each week.
We wanted to have the skill set to create different types of videos. There's a learning curve to creating quality videos, but once you’ve got it down, you get much faster and better. That doesn't mean you have to do everything yourself forever. It's much easier to outsource components of the process later.
After making our explainer, I was able to create several video ads and product tutorials. Here are a few examples:
I made this video for a Facebook ad. It's unbelievably simple, just animated text, and there isn't even audio. Once I had the script down, I made the video in about 10 minutes using Mac's Keynote presentation software. The crazy thing about this video is it worked much better than most others we tried.
Here is another ad I made using Keynote. Again, nothing complicated here. This video is just moving images, some basic text, and a voiceover by a skinny, white British guy who sounds like Morgan Freeman.
Here is a product tutorial with custom animation, done entirely in Keynote.
I don't regret making our own explainer video, but it's definitely not for everyone.
I didn't track how long our explainer took, but it was a loooooong time. How long? If I had to guess, I'd say about 40 hours. A large percentage of that time was filled with research, learning, and trial and error.
Luckily for you, I'm going to lay everything out so you'll save a lot of learning time. If you keep the animation simple, you can get this done in just a few hours.
To put together a good video, you need to know how to tell a story or pitch. Plus you'll need to know how to navigate presentation software and have a eye for what looks good visually.
Ok, let's get into it.
There are a few different techniques you can use to present your explainer.
Shooting video has gotten much easier. An HDR camera will take amazing video, and even iPhone footage can look incredible.
I didn't end up going this route with our explainer because our product has some concepts that are easier to explain with graphics and animation. Plus, lighting, sound, and unpaid actors weren't things I wanted to deal with. All of that is very doable, though, and I hope to incorporate it in the future.
Here is an extremely well-done example by one of my favorite video companies, Sandwich Video. It relies almost entirely on footage and explains the product very well. Just keep in mind that pulling off high-quality footage with interesting actors isn't easy.
The visual part of this video by Design Pickle is made with background video, pictures, and a bit of animated text. Then they laid down the voiceover on top of the visual components and it comes together nicely.
This video is professionally done with original footage, but if you can't get custom footage or images, you can use B-roll and stock images.
If you have a software product, you can just record yourself using the product. This is probably the easiest type of video to make. But, unless you're Basecamp, recording yourself using software may not be enough to sell your software. Consider using a screen recording along with some of the other techniques.
Here's another simple explainer video for Bitesize PR I made using Keynote. Again, there is nothing fancy going on here. The shapes and animations are all very basic, but the explainer still works really well.
This video by Pull Reminders probably needs a little more to be an effective explainer, but it's a good example of how screenshots, background color, and a few slide transitions can make a sharp video.
If you have a software product, combining screen recording with animation come together nicely. Some animations of this video by Clearbit are pretty advanced but most of it can be done with simple animations.
Here are the tools I used to create this video.
The script is the most important part of your explainer. A million dollar video can't overcome a bad script.
Most explainer scripts follow a very simple formula:
You describe a problem your audience has. Every infomercial you've ever seen starts with a problem. It's the exasperated mom with dull knives that can't chop vegetables. It's the dad who trips like Monty Python when he enters his messy garage, or the old lady who tumbles to the ground.
Make the problem identifiable and easy to understand, and explain it as quickly as possible. If the problem is complicated or takes a long time to explain, you'll lose people.
Describe how you can solve the problem.
Benefits, not features - Just rattling off a list of features isn't enough. Directly support your solution to the bigger problem and explain exactly how you will improve your viewers’ lives.
Show, not tell - Whenever possible, you need to actually demonstrate the solution. If you have software, record snippets of someone using the software. If you have a physical product, show someone actually handling it.
Prioritize - I'm sure there are 157 reasons why your solution is great, but keep it to a handful of them. Just because you can do something doesn't mean it should be in the video. Prioritize the things that have the biggest impact on the most people.
Once people buy into the idea that your solution could work, you need to prove it. The best way to do that is through other people like them. Video interviews of your clients or customers talking about your product can be very convincing. Of course, these are tough to pull off. So, here are a few other forms of social proof:
The call to action is what you want the viewer to do next. The action should match the sales effort put into the video. A quick video that simply piques interest might be effective for getting people to sign up for a free trial, but asking for a meeting or a sale may require more convincing.
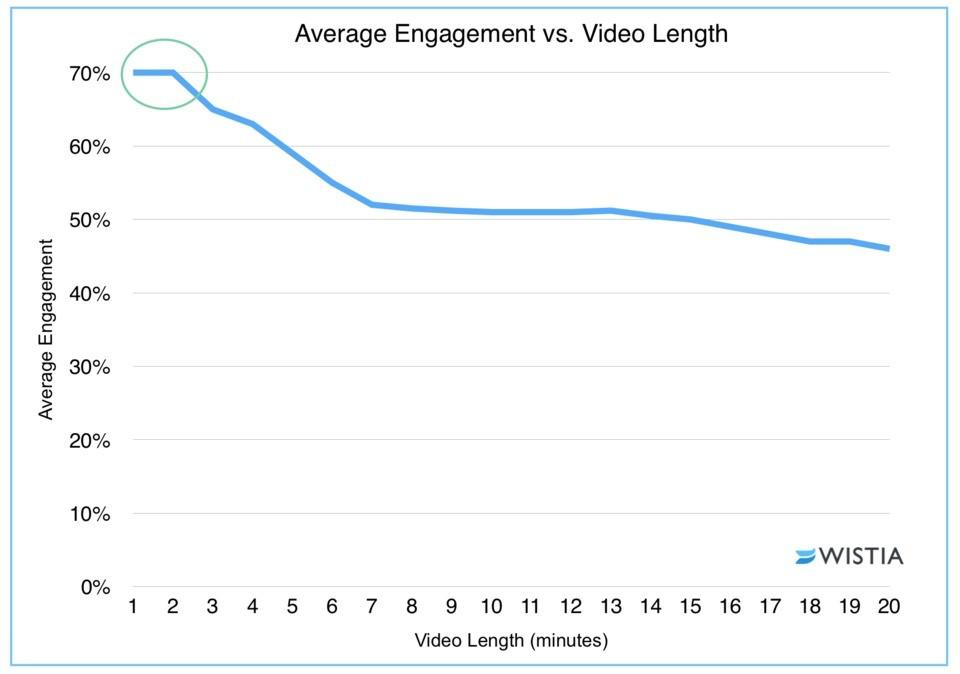
The conventional wisdom is that short videos retain more viewers. Wistia analyzed over 1.3 billion video views and found very little difference in engagement between one- and two-minute videos, but after two minutes, viewership declined significantly.
We have a client who helps people with back pain. One of the campaigns we ran drove people to a landing page with a video on it. The video was simply words on a screen that ran for over 40 minutes, but it performed very well.
Chris Madden, Founder at Matchnode
Of course, the video has to be compelling, not just long.
The tone of your video needs to appeal to your target audience and be consistent with your website and your brand. A B2B explainer video will be more serious and professional than a video selling bubblegum to children.
People in a group talk to each other in a specific way. They have shared ideas, words, and inside jokes. The more you tap into that, the more likely your audience will connect with your video.
I'm not sure what it is about marketing people, but we sure do love buzzwords. How many times have you heard "big data?" Buzzwords are used so frequently in so many different situations that they quickly lose their meaning. So, when you feel a buzzword coming on, pretend someone asked you, "What on earth are you talking about?" Your simplified response is what you should actually say.
Humor is tricky. Done well, it helps you connect with your audience. Just understand that some portion of your audience won't find it funny. For those folks, it's annoying or even insulting.
Here's a response to our explainer:
This part of the explainer was trying to articulate a common frustration people have in a light-hearted way, but this person found it offensive. That's the only time I've gotten feedback like that, so the humor is probably worth it, but if I ran into that response more often, I'd reconsider using it.
When you're done with the script, read it out loud like an actor. We don't speak like we write, and written things can sound long or awkward when spoken. Edit the script so that it sounds like a natural conversation.
Use presentation software like Keynote, Powerpoint or Prezi. I created almost our entire explainer video with Apple's Keynote software. The steps below are based on Keynote, but PowerPoint has very similar functionality. The specific instructions will be different between Keynote and Powerpoint, but the steps and concepts are very similar.
Another presentation software to consider is Prezi. Prezi has a unique way of transitioning slides and I think it could work really well with an explainer video. I like Keynote, though, because it's easy to use and the animation functionality is intuitive.
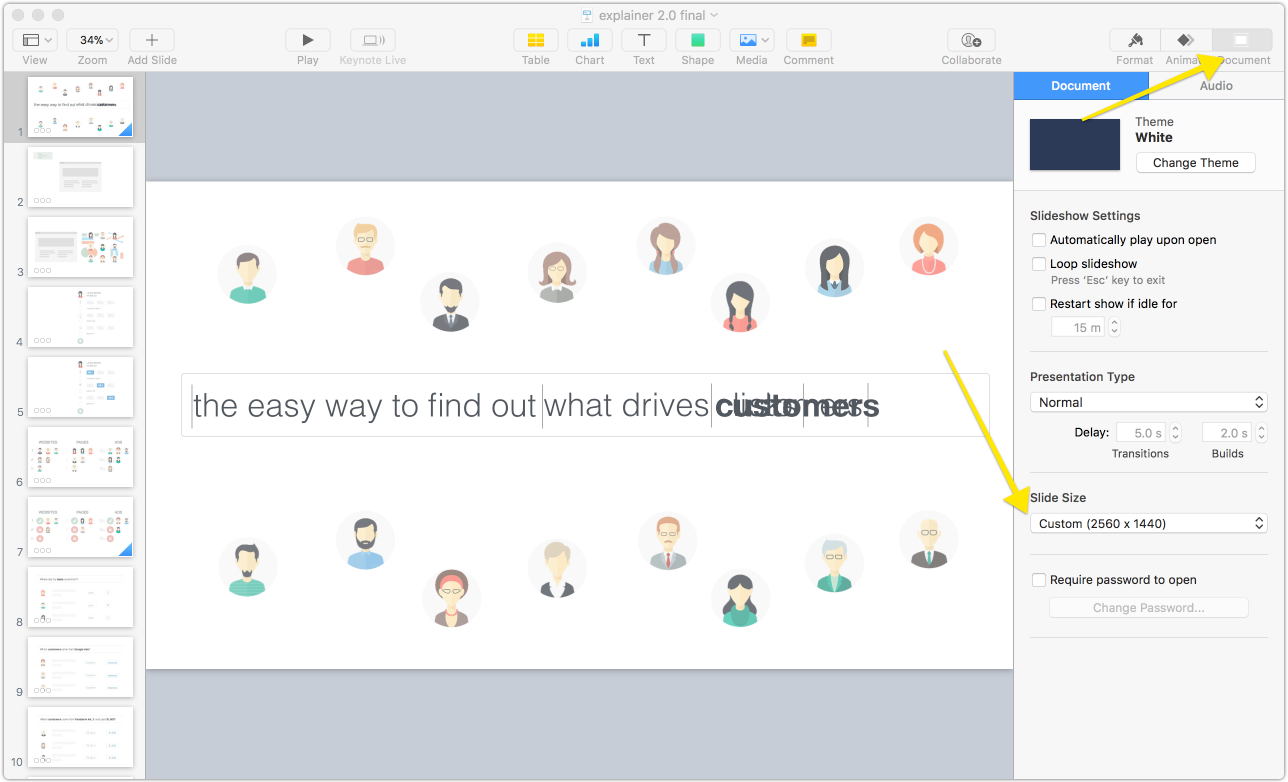
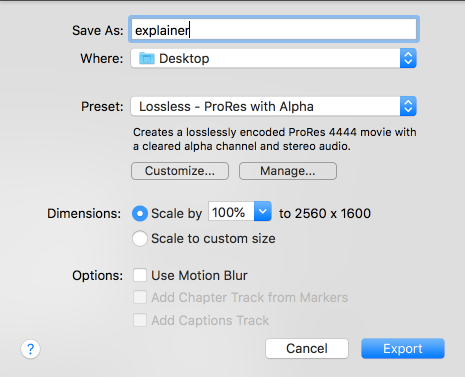
Before you get started, you need to know the dimensions of your final video. I used a resolution of 2560x1440, which is a common aspect ratio of 16:9 that will fit YouTube's video player perfectly. Also, these dimensions give the video HD quality on a desktop.
Here's how to set the dimensions:
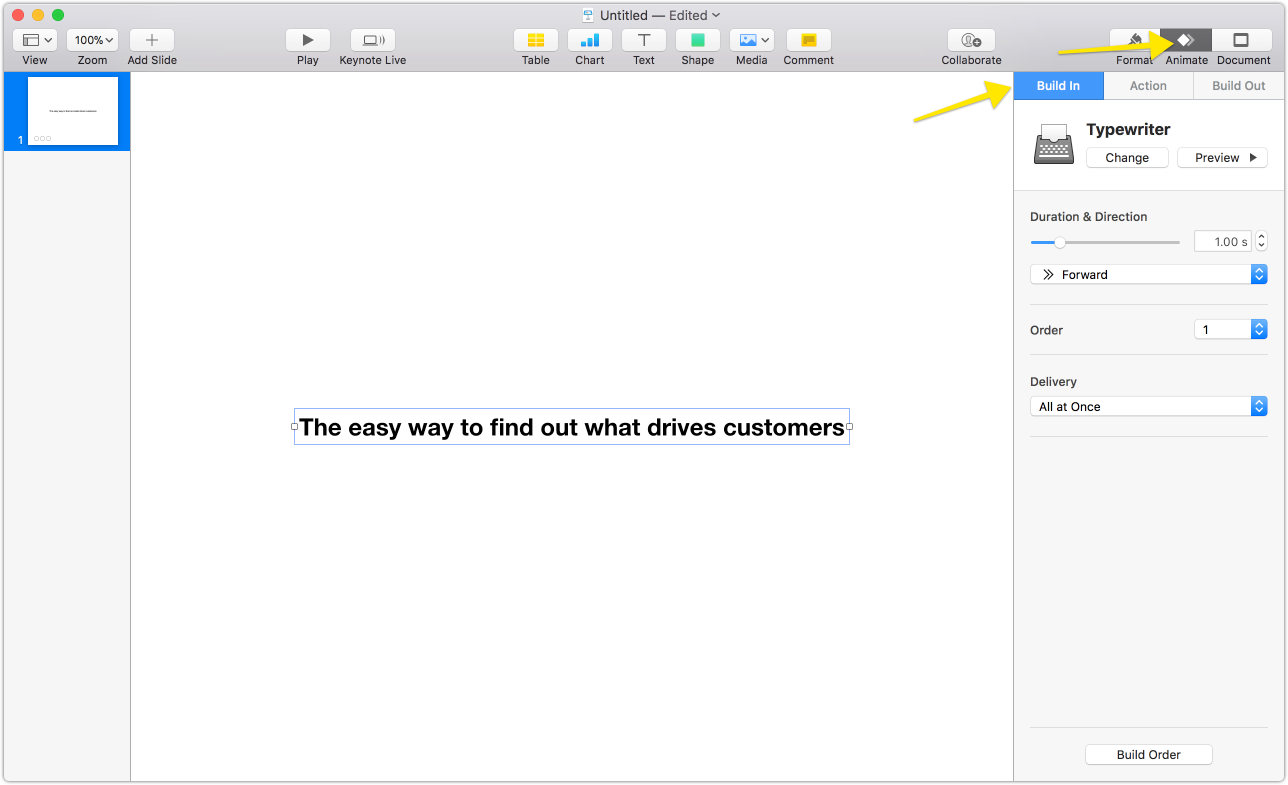
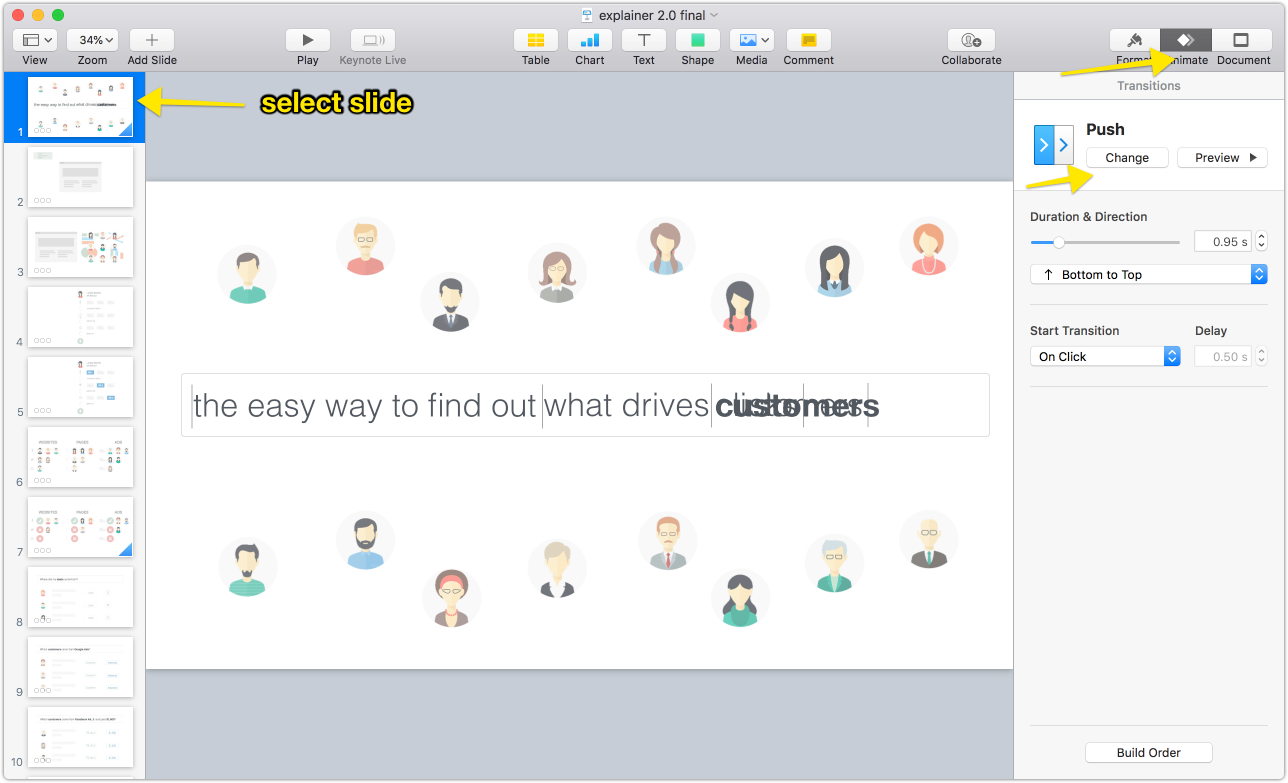
For the first slide, I recommend displaying one short sentence that explains what your product or service does and animate that text.
Here is how to animate the text
I used stock icons from Istockphoto. Once you download graphics, just copy and paste or drag and drop them into the presentation.
The shapes in this presentation are incredibly basic. I used circles, rectangles, and rounded rectangles. That's pretty much it. Even the more "complicated" graphics are just shapes grouped together.
Here's how to create shapes:
Here's how to group shapes:
When the shapes are grouped, they will behave as one shape.
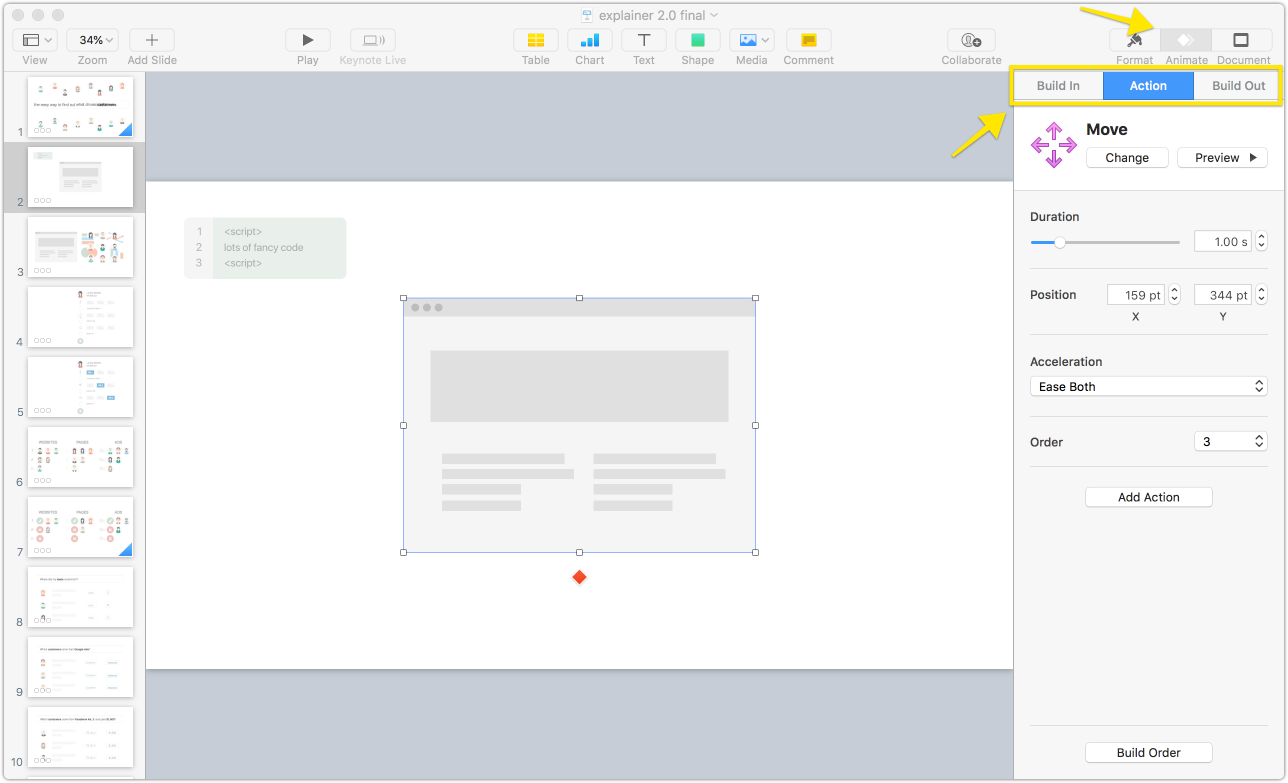
One of the great benefits of using keynote is how easy it is to create animations.
Here are a few reasons to use animations:
Animations can be distracting if they are unusual or too frequent, so use them sparingly. Keep them simple and be consistent.
To animate graphics or shapes:
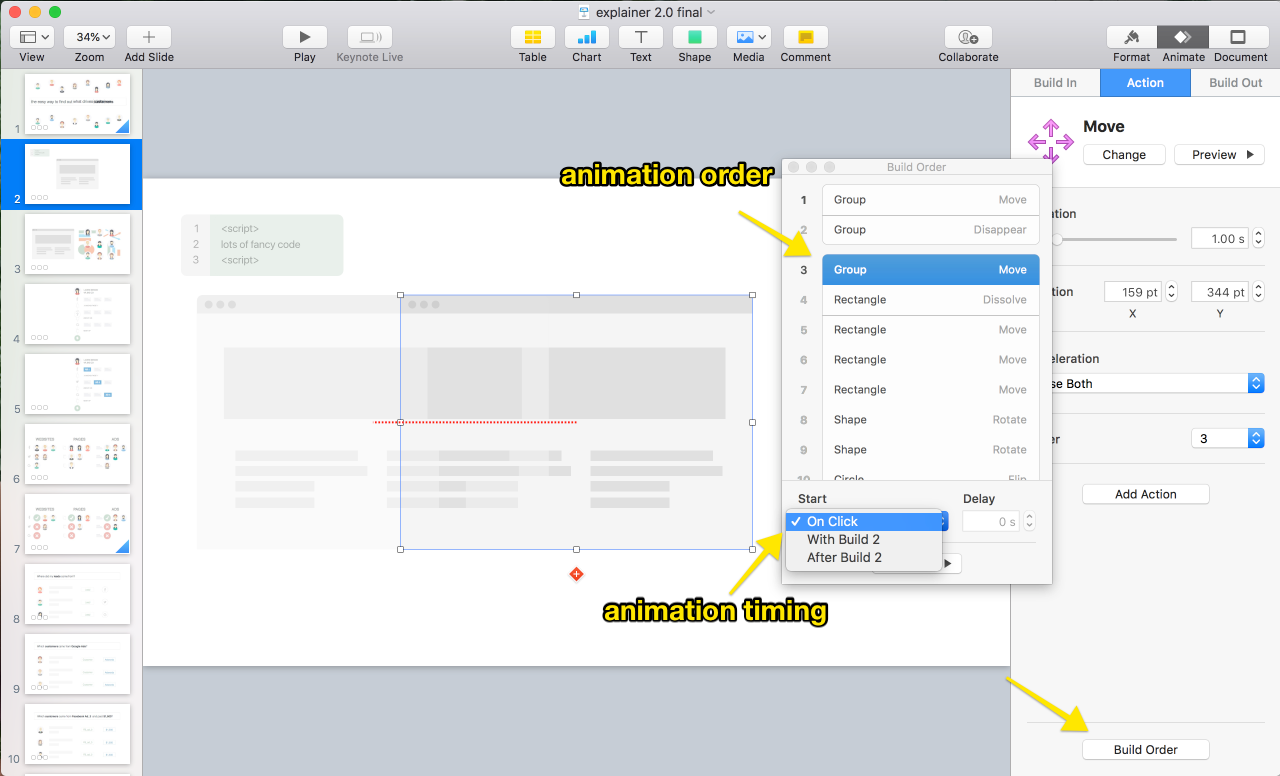
To see and edit the order of your animations:
Here, you can customize the order in which your animation appears and modify the timing. Try to get the timing close, but it doesn't have to be perfect because you can edit the timing in a later step.
Once you have your slide done, click "add slide" to create the next one. Then, create a transition animation to make your next slide appear smoothly. Doing this will make your presentation feel more like a video and less like a slideshow. Again, keep these transitions simple.
To create a transition:
Transitions can be distracting if you use uncommon ones, so keep it simple. For almost all the transitions, "push," "move in," or "dissolve" will do the trick.
Once you are done with your presentation, export it as a video.
To export your presentation:
Once the video file has downloaded, watch it to make sure there aren't mistakes, but don't worry too much about the timing of slide transitions. This can be fixed in the next step.
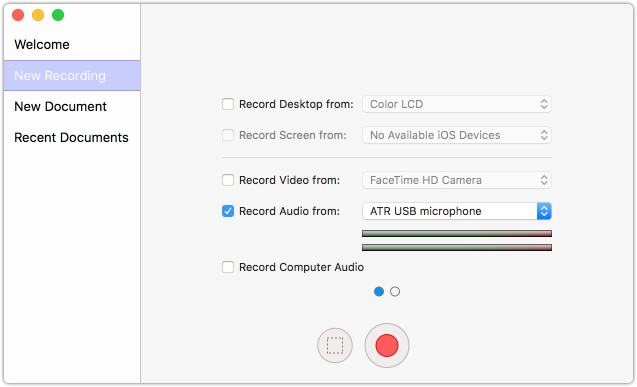
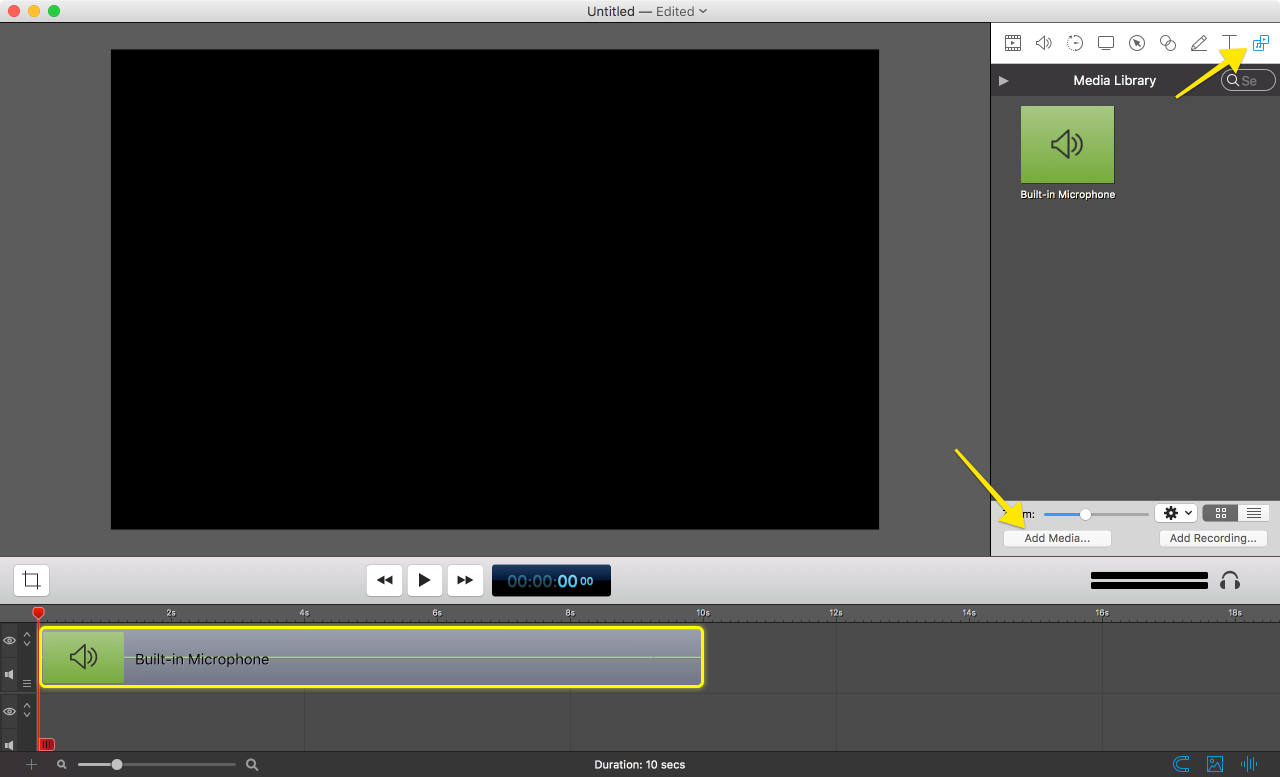
There are many ways to record your voiceover, but Screenflow makes it pretty simple.
To record a voiceover:
Sound quality is important when you make a video. Bad sound not only comes across as amateurish, but it's also just hard to listen to. The first time I did this, the sound was terrible.
The microphone I used is the ATR2100-USB. I'm not an audio expert, so you may be able to get a higher quality mic for less money. But I highly recommend getting an external microphone because your laptop or phone mic probably isn't going to cut it.
I made the mistake of recording our first voiceover in a conference room and the background echo was pretty bad. Find a small room with soft surfaces to absorb sound. One hilarious trick is to sit on a bed or carpet and put a blanket over your head while you record the voiceover. Laugh all you want, but it works really well.
In the first few videos I did, my voice was downright depressing. It was slow, quiet, and dull. Make sure your voice is upbeat, loud, and clearly articulated. Try to keep a somewhat consistent volume; don't go from a whisper to a shout.
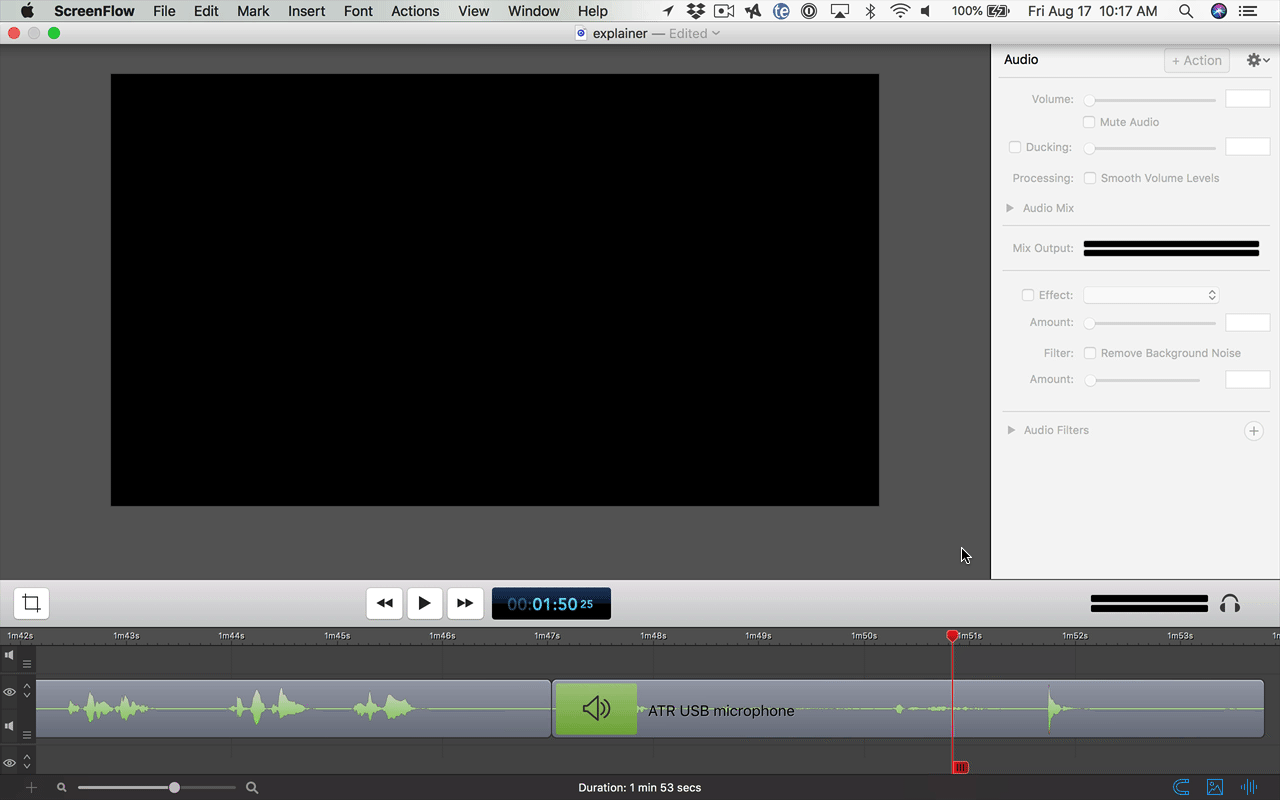
When you make a mistake or a when phrase doesn't sound quite right, clap loudly, pause for a second, and try again. A loud clap will show up in the audio as a spike, making it easy to find your mistake later and cut it out.
To cut out sections of an audio file:
In the next step, you'll add other components to your video like music, sound effects, and other videos. I use the Mac software called Screenflow, but most of these concepts can also be done with Mac's iMovie.
Sound effects can add a nice touch to your video if you use animations. But, like animations, don't go overboard or they will become distracting. Use them sparingly and lower the volume to keep the sound subtle. I used Audio Jungle, but there are a ton of sound effect sites out there. Once you find what you need, add the audio file just like you did for the voiceover.
Find background music that matches the feel of your video. It can be inspiring, quirky, exciting, professional, or upbeat. The default background music seems to be an upbeat ukulele. I wanted to do something different and I spent/wasted a lot of time trying to find the right background music. I finally came across Wistia's free background music and it worked great.
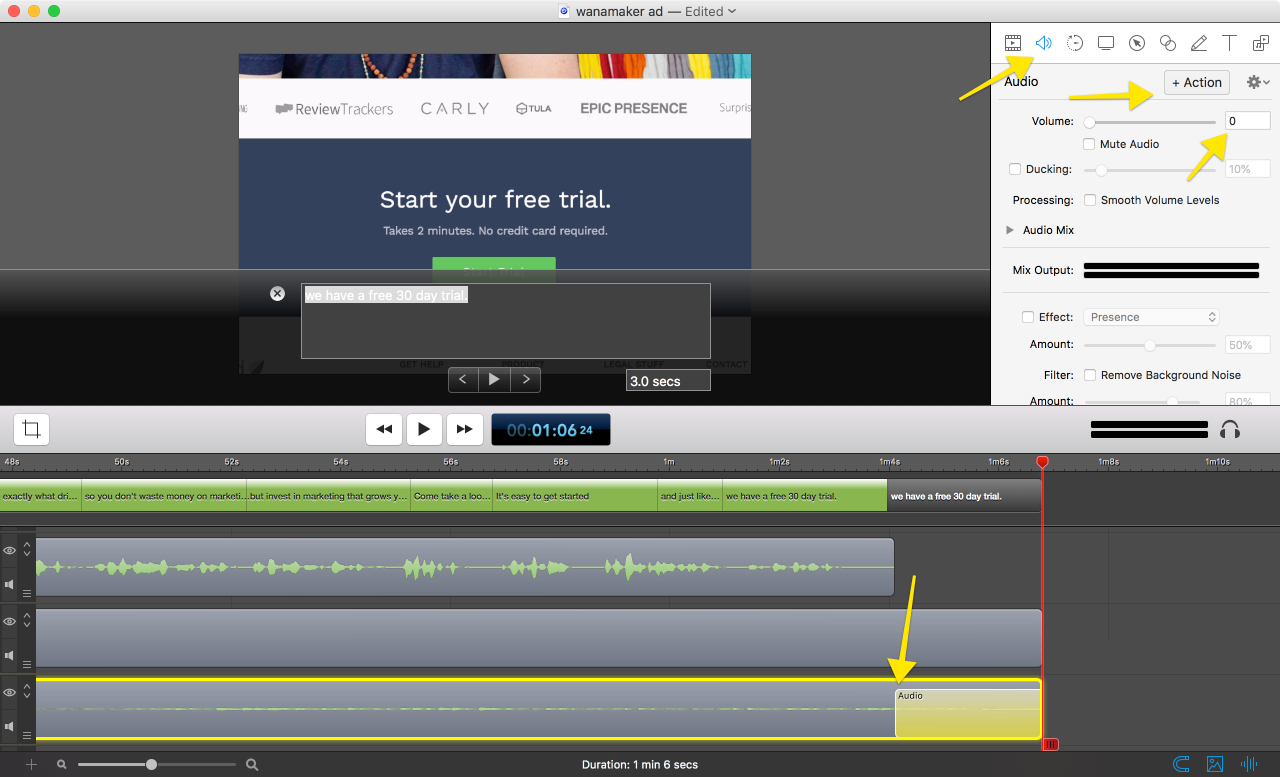
Once the audio and video files are done, you'll add everything into one file. Then, you'll edit volume levels and line up the files so that the audio and video timings match.
Before you dive into editing the video, consider outsourcing this part. I decided to take it on because I wanted to learn how to do it for demos and video ads. But once you have all the elements of the video in place, you can find a freelance video editor on Upwork to edit your video for less than $50. You'll need to find and hire them and go through a few rounds of revisions, but you'll still save a lot of time.
Once you have your other video and audio files done, you'll add them to Screenflow. Note that while the specifics will differ, the same concepts apply to Mac's iMovie or most other video editing software.
To add your video or audio files:
When you add background music and sound effects, adjust the volume so it doesn't drown out or distract from your voiceover. With background music, fade the volume at the end of the video so it doesn't come to an abrupt end.
To adjust the volume:
To fade volume:
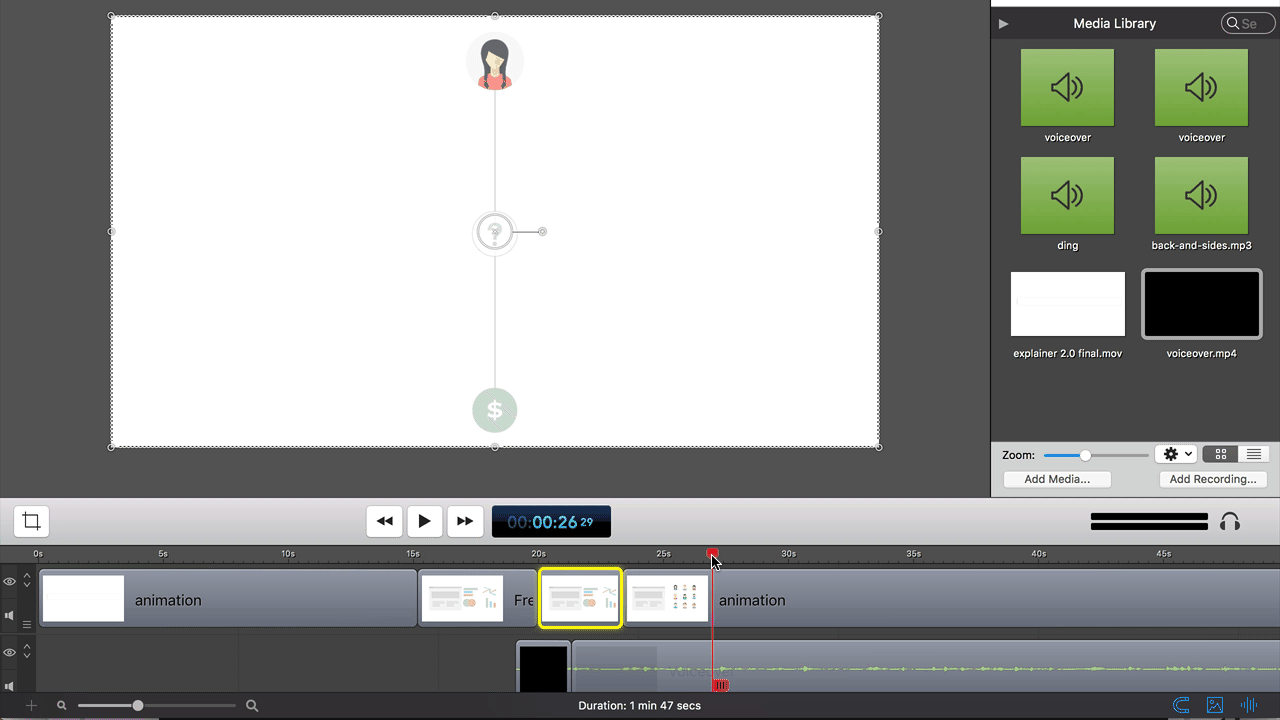
When you first import your audio and video files, the timing of the files won't match up, so you'll need to make changes to both. You can't change the speed of your audio because it will distort your voice, so your only options in editing the audio are to move sections to match the video or to cut out sections of the audio. With the video file, you can make it go faster, slower, or pause the video to match the timing of the voiceover.
When you cut out a portion of a video, you need to make sure there is no motion where you make the cut, otherwise, the video will "jump."
To cut out sections of your video:
When you pause a video, what you are really doing is adding a screenshot, or "freeze frame," of the video in between two video clips.
To add a Freeze Frame:
Once you have reviewed your video, export the video and upload it to the channels that make sense for you. Screenflow has a publish feature that lets you publish directly to video services like YouTube and Wistia, but for some reason, I couldn't get the quality right and had better luck exporting the video as a file and then uploading it.
To export a video:
Before you throw your explainer up on your website and promote it, it's a good idea to get feedback. There's a good chance you'll miss things. For example, several people told me the audio on my video sucked. They were right, so I redid it.
I recommend sharing your video with these people in this order:
Sure, your mom is probably going to tell you, "It's wonderful, honey," but cousins and siblings will take joy in humbling you. Plus, they'll pick up on bad audio, cheesy music, or bad graphics.
Once you get the basics down, share it with people who understand your business. They'll give you insight on whether your Problem > Solution > Call to action is good.
If you have an email newsletter or prospect list, you'll get feedback from the people who matter the most. Plus, this is a sneaky excuse to make people aware of your business without formally pitching to them.
Once you have your explainer in good shape, you want people to watch it, right? Here are a few places to put it for maximum viewership:
Add your video above the fold on your website. You can use Wistia or Youtube to embed it, but make sure to test it on different devices to make sure nothing funky happens when people try to watch it.
I've seen people add an image link to their explainer in their footer and we added our explainer to our product navigation dropdown.
You'll want to upload your video to Youtube to share it, but you can also add your explainer to the homepage on your own Youtube channel.
When someone signs up to your service or submits a contact request, don't assume they've already watched your explainer. Include a link to Youtube.
Include your explainer in your newsletter and don't forget to ask people to give you feedback on it.
Once you upload your video to Youtube, you can share the link to it on your LinkedIn company page. When you post a Youtube link, LinkedIn creates a thumbnail of the video. Then, pin the post so it's the first thing people see.
Like LinkedIn, you can post a link to your Youtube video and pin the post so it's the first post people see.
Instead of using a cover image on your company Facebook page, you can upload your video there.
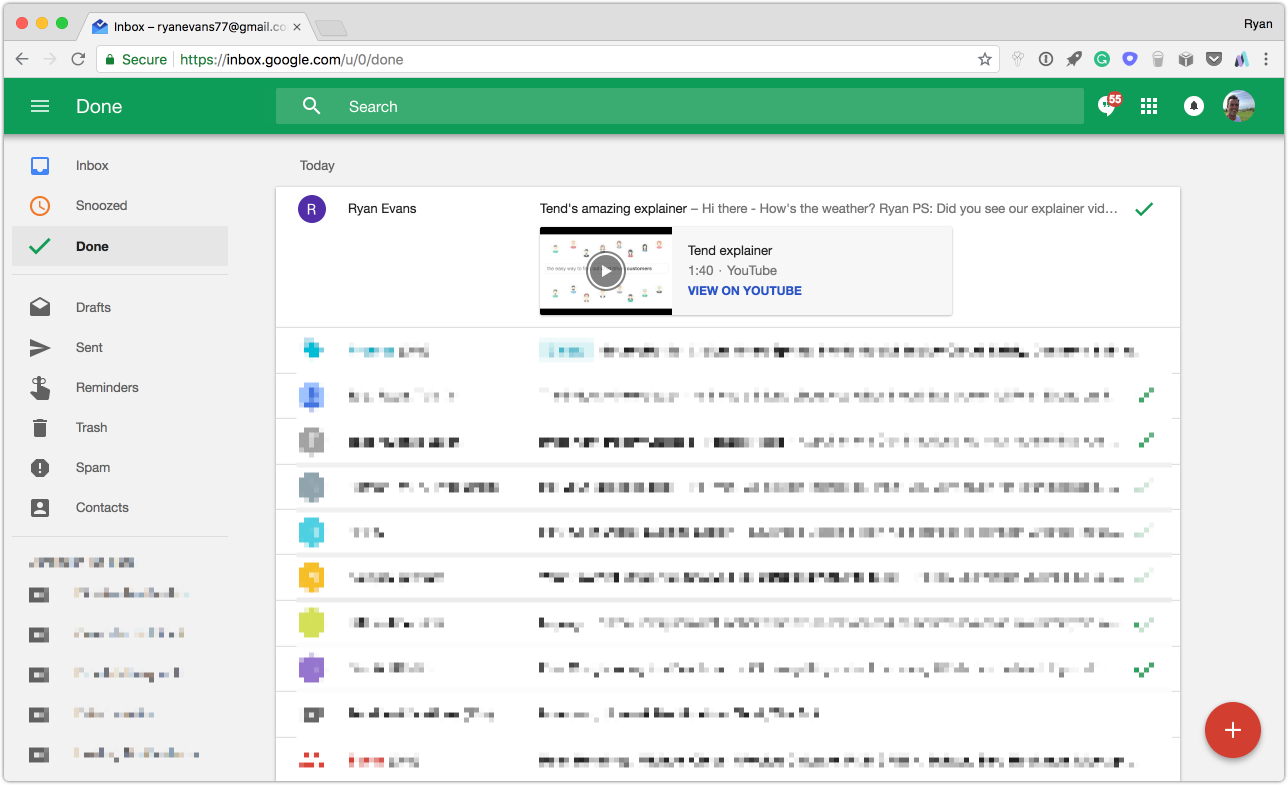
When you include a Youtube video link in your email and the recipient uses Gmail, your video will show up as an embedded thumbnail, which makes it easily visible. Better yet, if the recipient uses Google's Inbox, the thumbnail will show up in the email preview:
Whew! Okay, I know it was a lot, but I hope you found thispost helpful. If there is anything confusing or if you get stuck, just send me an email.
If you decide to make your own explainer video using this technique, let me know; I'd love to see how it turned out!
Subscribe to our Newsletter